Originally posted on October 7, 2022 @ 11:50 am
When sharing information on your screen to collaborate, screen recording is one of the most straightforward solutions. Whether you want to capture a tiny part of the screen to explain how the app works to your team members or document your fastest run in your well-liked arcade game and show it off to your friends, screen recording is the way to go. Fortunately, Macs come with an in-built tool to make a screen recording a piece of cake.
Here’s how you can record your screen on your MacBook and share it with others.
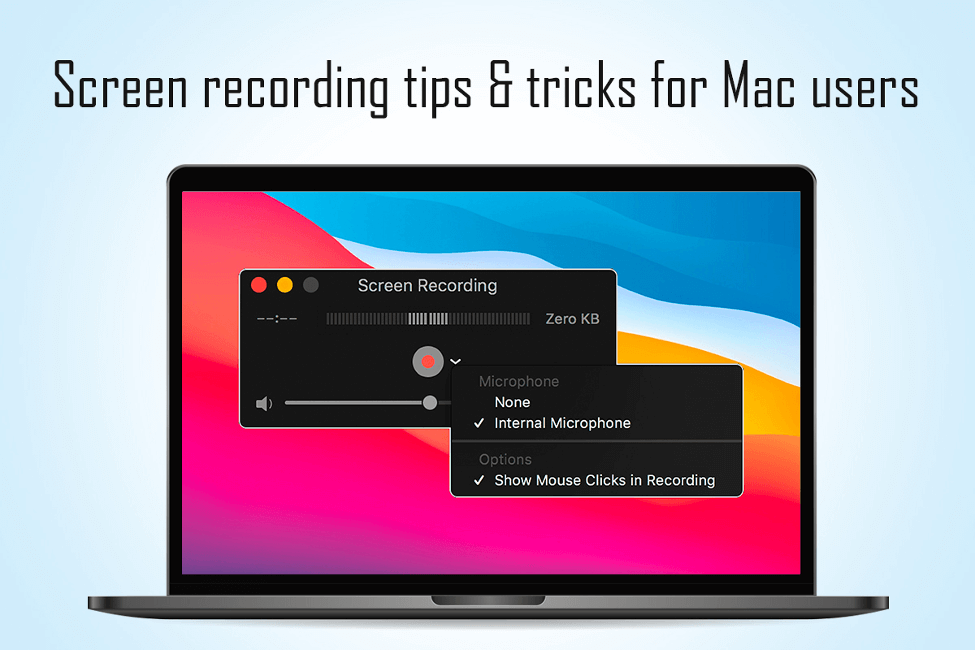
- Press Command + Shift + 5 on your keyboard, and in the bottom middle of your screen, select the triangle with a circle icon to record the entire screen. If you want to record a screen selection, choose the dotted-line rectangle with a circle icon.
- Choose the Options button if you want to enable the microphone and select a save location. If you want to learn how to record your screen with audio, click setapp.com.
- Select Record to start and when you are done, click the Stop button.
The recording would be saved on your system’s desktop unless you selected a different save location.
Alternatively, you can pull up the menu in QuickTime by clicking File > selecting New Screen Recording. If you have multiple displays, you can choose which screen to record and when you are done, choose the Stop button.
Keep scrolling to know the most effective screen recording hacks on a Mac.
Tips & Tricks for Recording Your Mac Screen
- You can capture anything on your Mac’s screen
The most significant benefit of screen recording is capturing anything you see on the Mac screen. It can be website pages, PowerPoint presentations, or anything you are viewing at the moment. However, it would be best to clear the desktop icons because whatever is on your screen will be captured. It would be best if you also disabled pop-up notifications.
To capture the screenshot of your entire screen, press Shift + Command + 3. The picture will be saved on the desktop.
To capture only a part of the Mac screen, press Shift + Command + 4.
- The audio quality is important
Mac allows users to video record the screen with audio. However, before you start recording your screen with audio, you must keep in mind some things. For example, using the in-built microphone may seem convenient, but you will not get the desired results. So instead, you must use an external microphone to augment the audio quality.
Then, you must tackle the background noise and ensure it does not make its way to the screencast recording. While some programs allow users to eliminate background noise later, it is best to deal with it before you start recording the screen with audio.
Last but not least, you must ensure to place the microphone strategically so your voice is recorded with great clarity.
- The recording must be of an appropriate size
Recording the entire screen is possible but might provide an inferior viewing experience. You must focus on the details if you need to capture only a part of the screen and share it with your colleagues or friends. Do not let anything unnecessary come in the way of critical information you wish to share.
When recording a section of the display or screen, ensure the dimensions will work no matter where the video is hosted. So, stick with the standard ranges. If your video is too tall or too wide, it may have dark-filled bars on the sides or top when viewed on YouTube, Vimeo, etc.
But if you are confused, it is best to capture the entire screen. You wouldn’t want to miss out on critical details.
- Be careful of the length of the screen recording
The effectiveness of the screen recording is impacted by its length. However, there’s no correct answer to this question.
While viewers typically prefer short videos, you cannot afford to miss out on critical details. If you skip essential information, your viewers will be unhappy, and the screen recording will not have served its purpose. On the other hand, if the recording is too long, it might bore the viewers.
Therefore, the best solution is to focus on the video’s content and ensure you do not skip any details while making it as brief as possible.
- Do not ignore the mouse cursor
The mouse cursor may seem insignificant, but not when it appears in every screen recording, hiding important words or objects. However, you can use the cursor to explain to your audience what you are talking about in the screen recording.
The Bottom Line
Recording your Mac screen helps provide your colleagues with the information they need. Learn the tricks mentioned above to streamline your experience and share meaningful screen recordings.